Deep dive on the security and compliance features available in Ubuntu Pro
In case you’re asking yourself “Ok! I deployed Ubuntu Pro, what now?”, this article will do a deep dive on the security and compliance features available in Ubuntu Pro, such as FIPS, CIS, Open source security, 10-year lifetime and Livepatch.
What is Ubuntu Pro really?
One thing to know is that Ubuntu Pro is just like your regular Ubuntu LTS, but with added security features added on top of it. Whatever workload you had running on Ubuntu LTS, you’ll be able to run its equivalent in Ubuntu Pro.
Therefore Ubuntu Pro is perfect for users wanting to get a few more years of security patches on top of their end of life Ubuntu 16.04, or for those looking to get FIPS compliance or CIS hardening, etc. You can look at the other articles of my blog for ideas on how to use and consume Ubuntu Pro.
About the pricing
Another thing to know is that Ubuntu Pro is a premium image and applies a small extra cost to your instance cost. The Canonical website says:
Ubuntu Pro pricing tracks the underlying compute cost, starting at under $0.01 for the smallest B1ls instance type, and ramping down to less than 1% of hourly compute.
Pricing details are included inside the description of the image on the Azure Marketplace directly.
Launching Ubuntu Pro
The first step is to launch an Ubuntu Pro instance. For this article, I’ll be mostly using the latest Ubuntu Pro 18.04 LTS image available on the Azure marketplace, as of May 11th 2021. If you want to follow along, just make sure you have an Azure account and click on that link to launch it yourself.
Once you have an Ubuntu Pro instance launched, SSH to your instance and let’s explore the features. Remember that this article was written with Ubuntu Pro 18.04 in mind and other releases of Ubuntu Pro might have a small delta in the set of features available.
Note about the version of the UA client
Some of the features and commands described in this article require a recent version of the UA client. Make sure you have version 26.2 or above before proceeding (I recommend version 27+):
$ ua version
27.0~18.04.1
If you don’t have a recent version, update your ubuntu-advantage-tools package:
$ sudo apt update
$ sudo apt install ubuntu-advantage-tools
If you still don’t get version 26.2+ from that command, consider adding the UA Client Stable PPA to your system and grab the more recent package from there:
$ sudo add-apt-repository ppa:ua-client/stable
$ sudo apt-get update
$ sudo apt install ubuntu-advantage-tools
If you do add the PPA, you might want to remove it after installing the new UA tools packages, otherwise you might be pulling newer versions of the UA tools in the future that you might not really want:
# optional
$ sudo add-apt-repository --remove ppa:ua-client/stable
Eventually all images of Ubuntu Pro will include a more recent version of the UA client, but for now these steps may be necessary until the versions get synchronized in all the releases of Ubuntu and get included in the Pro images on the public clouds.
Looking at the available features
The first thing you’ll want to do is take a look at the available security features. To do that, just run ua status.
$ ua status
SERVICE       ENTITLED  STATUS    DESCRIPTION
esm-apps      yes       enabled   UA Apps: Extended Security Maintenance (ESM)
esm-infra     yes       enabled   UA Infra: Extended Security Maintenance (ESM)
fips          yes       disabled  NIST-certified FIPS modules
fips-updates  yes       disabled  Uncertified security updates to FIPS modules
livepatch     yes       enabled   Canonical Livepatch service

Enable services with: ua enable <service>

                Account: <redacted>
           Subscription: <redacted>
            Valid until: 9999-12-31 00:00:00
Technical support level: essential
Another cool trick is to use sudo ua status --wait to wait for the status of UA to be stabilized after you launch your Pro instance for the first time:
$ sudo ua status --wait
This can be helpful because it takes about a minute for the auto-attach of the UA client to do its thing after you launch an instance:
$ ua auto-attach --help

usage: ua auto-attach [flags]

Automatically attach an Ubuntu Advantage token on Ubuntu Pro images.
So back to the features, here are the available features in Ubuntu Pro 18.04:
SERVICE       ENTITLED  STATUS    DESCRIPTION
esm-apps      yes       enabled   UA Apps: Extended Security Maintenance (ESM)
esm-infra     yes       enabled   UA Infra: Extended Security Maintenance (ESM)
fips          yes       disabled  NIST-certified FIPS modules
fips-updates  yes       disabled  Uncertified security updates to FIPS modules
livepatch     yes       enabled   Canonical Livepatch service
If you use the --all flag, you can even see more beta features, such as CIS:
$ ua status --all

SERVICE       ENTITLED  STATUS    DESCRIPTION
cc-eal        yes       n/a       Common Criteria EAL2 Provisioning Packages
cis           yes       disabled  Center for Internet Security Audit Tools
esm-apps      yes       enabled   UA Apps: Extended Security Maintenance (ESM)
esm-infra     yes       enabled   UA Infra: Extended Security Maintenance (ESM)
fips          yes       disabled  NIST-certified FIPS modules
fips-updates  yes       disabled  Uncertified security updates to FIPS modules
livepatch     yes       enabled   Canonical Livepatch service
So now let’s go through some of them and see how we can use them.
FIPS
There are 2 lines in ua status for FIPS:
$ ua status

SERVICE       ENTITLED  STATUS    DESCRIPTION
fips          yes       disabled  NIST-certified FIPS modules
fips-updates  yes       disabled  Uncertified security updates to FIPS modules
The difference is that fips-updates will include security patches against CVEs, at the cost of making the packages no longer FIPS certified. This is explained in better detail in the Ubuntu blog article FIPS 140-2: Stay compliant and secure with Canonical.
The TL;DR is:
If you work for a federal government department that collects, stores, transfers and shares sensitive but unclassified information, it’s likely that you’re required to use FIPS Certified modules without any modifications. In other cases – we recommend using FIPS Certified modules that include all security patches. We call it Ubuntu FIPS Compliant.
For this example, I’ll go ahead and use the FIPS Compliant (but not certified) fips-updates feature.
Note that Canonical offers FIPS certified out-of-the-box images on AWS and Azure. Those images come pre-installed with the FIPS certified modules and kernel installed, which lets you skip the step of enabling FIPS yourself. However if you prefer to use the FIPS compliant fips-updates feature, then I recommend you start with regular Ubuntu Pro and enable fips-updates yourself.
So let’s go ahead and enable fips-updates:
$ sudo ua enable fips-updates

One moment, checking your subscription first
This system will NOT be considered FIPS certified, but will include security
and bug fixes to the FIPS packages.
Are you sure? (y/N) y

FIPS Updates cannot be enabled with Livepatch.
Disable Livepatch and proceed to enable FIPS Updates? (y/N)y

Disabling incompatible service: Livepatch
Updating package lists
Installing FIPS Updates packages
FIPS Updates enabled
A reboot is required to complete install.
You’ll notice two prompts in the above output. The first one is a warning that fips-updates is not considered FIPS certified, but will include security and bug fixes, just like I explained above.
The second prompt is telling you that you have to disable Livepatch in order to enable fips/fips-updates. This is because the kernel livepatches are built for specific kernels and the fips kernels are not part of them. More on livepatch later in this article.
The last line in the output above says we need to reboot to enable fips, so make sure to reboot your instance before continuing.
Once your instance is rebooted, SSH back in and here is how you can verify that FIPS is running:
$ ua status

SERVICE       ENTITLED  STATUS    DESCRIPTION
...
fips-updates  yes       enabled   Uncertified security updates to FIPS modules
...

$ uname -a
Linux bionicpro2021-05-11-12-06-48 4.15.0-2026-azure-fips #29-Ubuntu SMP Thu Apr 22 22:36:02 UTC 2021 x86_64 x86_64 x86_64 GNU/Linux

$ cat /proc/sys/crypto/fips_enabled
1
Notice in the output above that fips-updates is now enabled and we can see that we’re now running the kernel 4.15.0-2026-azure-fips. We also check that cat /proc/sys/crypto/fips_enabled returns 1 to confirm that FIPS is enabled on this system.
From there, it’s up to you to use workloads that can benefit from these FIPS kernel and modules. You can see the list of fips packages that were installed by running:
$ dpkg -l | grep -i fips

ii  fips-initramfs                           0.0.10                                      amd64        FIPS 140-2 kernel tests
ii  kcapi-tools                              1.0.3-2fips3                                amd64        Command-line tools for Linux Kernel Crypto API
ii  libgcrypt20:amd64                        1.8.1-4ubuntu1.fips.2.5                     amd64        LGPL Crypto library - runtime library
ii  libgcrypt20-hmac:amd64                   1.8.1-4ubuntu1.fips.2.5                     amd64        FIPS HMAC integrity check files for libgcrypt20 library.
ii  libkcapi1:amd64                          1.0.3-2fips3                                amd64        Linux Kernel Crypto API User Space Interface Library
ii  libssl1.1:amd64                          1.1.1-1ubuntu2.fips.2.1~18.04.9.1           amd64        Secure Sockets Layer toolkit - shared libraries
ii  libssl1.1-hmac:amd64                     1.1.1-1ubuntu2.fips.2.1~18.04.9.1           amd64        Secure Sockets Layer toolkit - FIPS HMAC integrity check
ii  linux-azure-fips                         4.15.0.2026.27                              amd64        Complete Linux kernel for Azure systems.
ii  linux-azure-fips-cloud-tools-4.15.0-2026 4.15.0-2026.29                              amd64        Linux kernel version specific cloud tools for version 4.15.0-2026
ii  linux-azure-fips-headers-4.15.0-2026     4.15.0-2026.29                              all          Header files related to Linux kernel version 4.15.0
ii  linux-azure-fips-tools-4.15.0-2026       4.15.0-2026.29                              amd64        Linux kernel version specific tools for version 4.15.0-2026
ii  linux-cloud-tools-4.15.0-2026-azure-fips 4.15.0-2026.29                              amd64        Linux kernel version specific cloud tools for version 4.15.0-2026
ii  linux-cloud-tools-azure-fips             4.15.0.2026.27                              amd64        Linux kernel versioned cloud tools for Azure systems.
ii  linux-headers-4.15.0-2026-azure-fips     4.15.0-2026.29                              amd64        Linux kernel headers for version 4.15.0 on 64 bit x86 SMP
ii  linux-headers-azure-fips                 4.15.0.2026.27                              amd64        Linux kernel headers for Azure systems.
ii  linux-image-4.15.0-2026-azure-fips       4.15.0-2026.29                              amd64        Signed kernel image azure-fips
ii  linux-image-azure-fips                   4.15.0.2026.27                              amd64        Linux kernel image for Azure systems.
ii  linux-image-hmac-4.15.0-2026-azure-fips  4.15.0-2026.29                              amd64        HMAC file for linux kernel image for version 4.15.0-2026
ii  linux-modules-4.15.0-2026-azure-fips     4.15.0-2026.29                              amd64        Linux kernel extra modules for version 4.15.0 on 64 bit x86 SMP
ii  linux-tools-4.15.0-2026-azure-fips       4.15.0-2026.29                              amd64        Linux kernel version specific tools for version 4.15.0-2026
ii  linux-tools-azure-fips                   4.15.0.2026.27                              amd64        Linux kernel versioned tools for Azure systems.
ii  openssh-client                           1:7.9p1-10~ubuntu18.04.fips.0.2             amd64        secure shell (SSH) client, for secure access to remote machines
ii  openssh-client-hmac:amd64                1:7.9p1-10~ubuntu18.04.fips.0.2             amd64        FIPS HMAC integrity check files for secure shell (SSH) client.
ii  openssh-server                           1:7.9p1-10~ubuntu18.04.fips.0.2             amd64        secure shell (SSH) server, for secure access from remote machines
ii  openssh-server-hmac:amd64                1:7.9p1-10~ubuntu18.04.fips.0.2             amd64        FIPS HMAC integrity check files for secure shell (SSH) server.
ii  openssh-sftp-server                      1:7.9p1-10~ubuntu18.04.fips.0.2             amd64        secure shell (SSH) sftp server module, for SFTP access from remote machines
ii  openssl                                  1.1.1-1ubuntu2.fips.2.1~18.04.9.1           amd64        Secure Sockets Layer toolkit - cryptographic utility
ii  ubuntu-azure-fips                        1.1.4+updates1                              amd64        Install and configure linux-azure-fips kernel and user space modules
CIS
As of this writing, CIS shows up in the beta features of the UA client:
$ ua status --all

SERVICE       ENTITLED  STATUS    DESCRIPTION
...
cis           yes       disabled  Center for Internet Security Audit Tools
...
You can enable it by using the --beta flag. I am doing this on a fresh new Ubuntu 18.04 Pro instance:
$ sudo ua enable cis --beta

One moment, checking your subscription first
Updating package lists
Installing CIS Audit packages
CIS Audit enabled
This step does not harden your system. It simply installs the CIS tooling from Canonical:
$ dpkg -l | grep usg

ii  usg-cisbenchmark                         18.04.17                                    all          SCAP content for CIS Ubuntu Benchmarks
ii  usg-common                               18.04.17                                    all          The CPE files for Ubuntu SCAP Content
You’ll want to follow the instructions from the Ubuntu Security Certifications Documentation website to run the CIS hardening and audit.
Here is the TL;DR. You can harden your Ubuntu 18.04 server with the level 1 server profile with the following:
$ sudo /usr/share/ubuntu-scap-security-guides/cis-hardening/Canonical_Ubuntu_18.04_CIS-harden.sh lvl1_server
Understand that this will make modifications to your system to bring it in line as much as possible with the CIS level 1 server profile. Run this script in a lab environment first as this might make your workloads unusable due to the security hardening. You may have to customise a few rules to make this fit your environment.
Once the CIS level 1 server hardening has completed, you can do an audit with the included CIS auditing tool:
$ sudo cis-audit level1_server

Title   Ensure mounting of cramfs filesystems is disabled
Rule    xccdf_com.ubuntu.bionic.cis_rule_CIS-1.1.1.1
Result  pass

Title   Ensure mounting of freevxfs filesystems is disabled
Rule    xccdf_com.ubuntu.bionic.cis_rule_CIS-1.1.1.2
Result  pass
[...]

CIS audit scan completed. The scan results are available in /usr/share/ubuntu-scap-security-guides/cis-18.04-report.html report.
This will generate an HTML report that you consult for your CIS score. Refer to my other article about CIS scoring comparison for screenshots.
Open source security
The next item we’re going to look at is the Open source security feature. This item corresponds to the esm-apps line in ua status:
$ ua status

SERVICE       ENTITLED  STATUS    DESCRIPTION
...
esm-apps      yes       enabled   UA Apps: Extended Security Maintenance (ESM)
...
This line corresponds to the extra esm.ubuntu.com/apps package repository that you see when you run apt update:
$ sudo apt update
...
Get:6 https://esm.ubuntu.com/apps/ubuntu bionic-apps-security InRelease [7612 B]
Get:7 https://esm.ubuntu.com/apps/ubuntu bionic-apps-updates InRelease [7524 B]
...
Fetched 119 kB in 2s (48.8 kB/s)
Reading package lists... Done
Building dependency tree
Reading state information... Done
25 packages can be upgraded. Run 'apt list --upgradable' to see them.
This repository contains patches from packages in universe and more. You can see that repository in action if you try to install Kafka on Ubuntu Pro. You can run apt-cache policy to see that it would pull the package from that repo:
ubuntu@bionicpro2021-05-11-12-06-48:~$ apt-cache policy kafka
kafka:
  Installed: (none)
  Candidate: 2.2.2u1-0ubuntu1+esm2
  Version table:
     2.2.2u1-0ubuntu1+esm2 500
        500 https://esm.ubuntu.com/apps/ubuntu bionic-apps-security/main amd64 Packages
This feature hasn’t been much advertised by Canonical yet, so that’s all we will cover for now.
10-year lifetime
The next one is the “10-year lifetime” feature. The Ubuntu Pro for Azure page says:
Canonical backs Ubuntu Pro for 10 years*, ensuring security updates are available throughout, with a guaranteed upgrade path.
There’s an asterisk that says:
For 18.04 LTS onwards. The maintenance period for Ubuntu Pro 14.04 LTS and 16.04 LTS is 8 years.
This item corresponds to the esm-infra line in ua status:
$ ua status

SERVICE       ENTITLED  STATUS    DESCRIPTION
...
esm-infra     yes       enabled   UA Infra: Extended Security Maintenance (ESM)
...
This line corresponds to the extra esm.ubuntu.com/infra package repository that you see when you run apt update:
$ sudo apt update
...
Hit:8 https://esm.ubuntu.com/infra/ubuntu bionic-infra-security InRelease
Hit:9 https://esm.ubuntu.com/infra/ubuntu bionic-infra-updates InRelease
...
This feature allows you to continue to receive security updates for the Ubuntu base OS, critical software packages and infrastructure components after that release of Ubuntu has reached the ESM period (previously called EOL or End Of Life).
Depending upon the LTS release, ESM provides three to five additional years of security maintenance. It provides security maintenance for high and critical CVEs for the entire collection of software packages shipped with Ubuntu.
Refer to the Ubuntu lifecycle and release cadence page to better understand the time periods when an Ubuntu release reaches ESM. Here’s a partial image from that page:
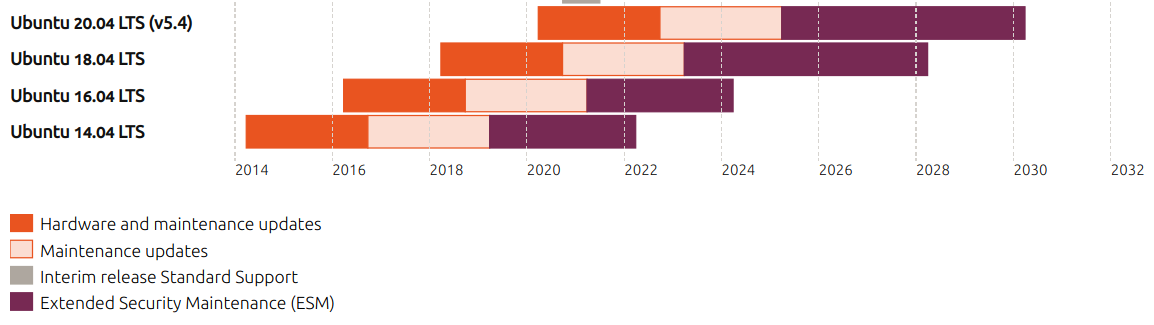
Notice how the purple periods represent ESM. You start getting benefits from this Ubuntu Pro feature only when the release reaches ESM. So if you’re running workloads on Ubuntu 16.04 LTS today, consider switching to Ubuntu Pro to continue to receive security updates. More details on the Extended Security Maintenance webpage.
You can get a more in-depth exploration of this feature in my other blog article How to get ESM in Auto Scaling groups in AWS with Ubuntu Pro 16.04.
Livepatch
I already cover this in depth in my article Kernel Livepatch in Ubuntu Pro 20.04, but here is a part of that article just to keep everything on one page here.
With Canonical’s Livepatch service, kernel patches are delivered immediately without the need to reboot your VMs.
That article was written with Ubuntu Pro 20.04 as the example. On the instance, check the kernel version:
ubuntu@focalpro:~$ uname -a
Linux focalpro 5.4.0-1012-azure #12-Ubuntu SMP Mon May 11 13:30:06 UTC 2020 x86_64 x86_64 x86_64 GNU/Linux
For this example, I downgraded by kernel version on purpose to be vulnerable against certain CVEs.
You can run canonical-livepatch status (I like to specify --format yaml to get more output) to see the status of livepatch. It’s possible that you won’t see any live patches if you launched a recent image of Ubuntu Pro.
Look at the status of livepatch:
ubuntu@focalpro:~$ canonical-livepatch status
last check: 52 seconds ago
kernel: 5.4.0-1012.12-azure
server check-in: succeeded
patch state: ✓ all applicable livepatch modules inserted
patch version: 75.2

ubuntu@focalpro:~$ canonical-livepatch status --format yaml
client-version: 9.5.5
architecture: x86_64
cpu-model: Intel(R) Xeon(R) CPU E5-2673 v4 @ 2.30GHz
last-check: 2021-04-08T17:41:06Z
boot-time: 2021-04-08T17:40:46Z
uptime: 1m0s
status:
- kernel: 5.4.0-1012.12-azure
  running: true
  livepatch:
    checkState: checked
    patchState: applied
    version: "75.2"
    fixes: |-
      * CVE-2013-1798
      * CVE-2019-0155
      * CVE-2019-0155: LP: #1852141
      * CVE-2019-14615
      * CVE-2019-14895
      * CVE-2019-14896
      * CVE-2019-14897
      * CVE-2019-14901
      * CVE-2019-18885
      * CVE-2019-19642
      * CVE-2019-20096
      * CVE-2019-3016
      * CVE-2020-10757
      * CVE-2020-11494
      * CVE-2020-11935
      * CVE-2020-12114
      * CVE-2020-12351
      * CVE-2020-12352
      * CVE-2020-14386
      * CVE-2020-14416
      * CVE-2020-16119
      * CVE-2020-16120
      * CVE-2020-24490
      * CVE-2020-27170
      * CVE-2020-27171
      * CVE-2020-2732
      * CVE-2020-28374
      * CVE-2020-8647
      * CVE-2020-8648
      * CVE-2020-8649
      * CVE-2021-27363
      * CVE-2021-27364
      * CVE-2021-27365
      * CVE-2021-3444
We can see that we’re running the version 75.2 of the livepatch bundle, which corresponds to the latest livepatch security notice in the USN mailing list. This bundle protects this kernel from 33 CVEs.
That mailing list is where you can find the information about each individual livepatch. If you start from the Ubuntu security announce mailing list archive, you can click on each month (I like to use the Date indices) and find the notices that have LSN instead of USN.
Conclusion
Hopefully this covers the essentials on the features that make up Ubuntu Pro. Ubuntu Pro on AWS and Azure (and now on Google Cloud too!) comes with Livepatch and ESM enabled out of the box, with extra security features you can enable with just one command. Check out my other articles to find more about Ubuntu Pro:
- CIS scoring comparison of the Ubuntu 16.04, 18.04 and 20.04 AMIs from CIS compared to Ubuntu Pro on AWS
- How to build an Ubuntu Pro golden image in GCP with Packer
- How to build an Ubuntu Pro golden image in AWS with Packer
- How to use Ubuntu Pro programmatically in AWS and Azure
- How to get ESM in Auto Scaling groups in AWS with Ubuntu Pro 16.04
- How to use Azure Pipelines with a self-hosted agent running Ubuntu Pro 18.04
- Create an Ubuntu Pro VM with infrastructure in Azure using Terraform